My need for an at home hosted web service came from trying to develop a simple FaceBook application. I needed my application hosted somewhere quick and didn't want to pay for hosting. I'm comfortable using Tomcat to host my java applications, so I decided to try to host my application at my computer at home for easier development and debugging.
The trick for hosting a site that is publicly accessible is to be able to use a non-moving target for DNS servers to resolve. Since most people don't get a static IP for home use without paying extra for it, they are stuck with a Dynamic IP address. This means that behind the scenes, you are "leasing" the IP address for a period of time, after which it is revoked and another address is assigned to you. For normal internet use, this is a seamless operation, but for web hosting we need a little help. I suggest using the free service offered by DynDNS to do hostname to Dynamic IP mapping. With their service you can create a hostname (for example, http://codebeneath.dyndns.org, a subdomain to dyndns.org) and configure that to resolve to your current IP address, which they detect for you. Or if you prefer, hit IP Chicken :)
Now, you need a way to detect when your IP address changes and automatically update your DynDNS entry. There are standalone clients that can do this, but I was lucky enough to have the capability built into my router, a LinkSys BEFSX41.

I have heard that some internet providers block port 80, so I decided just to use the default Tomcat port, which is 8080. If you stick with port 80 and run into problems, this may be the cause.
Next, we need to configure the router to forward all incoming port 8080 traffic to Tomcat. There are several ways to do this, depending on your router. The solution I don't recommend is enabling the DMZ Host setting (this is overkill and a potential security problem if you don't know what you are doing). The remaining alternatives are Port Range Forwarding and UPnP Forwarding. Port Range Forwarding is geared more for specialized internet applications such as videoconferencing or online gaming and can be used to forward an entire block of address at once.
For my case, I picked the simplest thing that worked: UPnP Forwarding. When I started, this was not the clear choice of how to do this, and many differing opinions steered me to conflicting directions. Compounding my confusion was an out-dated router firmware that provided administrative pages with different terminology and that did not even have UPnP Forwarding as an option.
I do recommend updating your router's firmware to avoid the same confusion I had and to have the latest security patches in place.
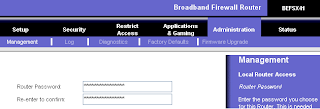
Login to your router by pointing your browser at the admin URL. For my LinkSys, the admin URL is http://192.168.1.1/. The default username is blank (none) and the password is "admin"
If you still have your default password, change it immediately before proceeding further!

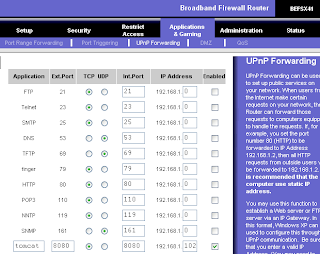
Click "Applications and Gaming" > "UPnP Fowarding".
On the first blank line enter "tomcat" as the application name, "8080" as the Ext. Port, "TCP" as the protocol to allow, "8080" as Int. Port, your internal network address (e.g. 192.168.1.xxx) and mark the Enabled checkbox. To obtain your internal network address, open a command shell and type ipconfig. A gotcha to watch out for is that your internal address may also be dynamic if your router assigns addresses via DHCP. To avoid this, you could statically configure your network devices addresses, but for my purposes DHCP was OK.

Save the router settings and close your browser.
Start Tomcat and make sure you can access http://localhost:8080. If so, then try the public address you created at DynDNS (in my case http://codebeneath.dyndns.org:8080). If all is well, you should be seeing the Tomcat welcome page! Deploy your web application and happy web hosting.


